Running UniFi Video on a Synology NAS
UPDATE 3 (2017-11-23) added instructions on migrating to custom SSL certificates sing v3.8.1+.
UPDATE 2 (2017-10-12): ctindel/unifi-video-controller:3.8.1 switches to the less permissive unifi-video user and attempts to chown the directory to that user during boot. Depending on your original mounted volume permissions, you may need an extra tweak on the host OS to ensure the script doesn’t fail:
❯ chown -R 107:109 /volume1/applications/unifi-video
❯ chmod -R 755 /volume1/applications/unifi-video
UPDATE 1 (2017-10-10): ctindel/unifi-video-controller:3.8.0 now uses port 7442 to securely manage cameras, therefore it has to be mapped.
UniFi Video Cameras require a controller software called UniFi Video. It usually runs on a dedicated appliance (also sold by Ubiquiti) named NVR. However, if you already have a NAS - more specifically, a Synology one - you can take advantage of it by running the UniFi Video software there without any issues. There’s one caveat though… it requires Docker.
A lot of the newer Synology NAS devices support running Docker (check the Applied Models footnote), which makes it very easy to run the UniFi Video software inside a container.
First, login via ssh and create a directory where you’d like to store the controller data, including its database, metadata and videos:
❯ mkdir -p /volume1/applications/unifi-video
If you haven’t created a Docker network for running your containers, do so:
docker network create -d bridge iot
Then run the container mapping the ports that make sense for your setup:
❯ docker run --restart always \
  --network iot \
  --name unifi-video \
  -h unifi-video \
  -p 6666:6666 \
  -p 7080:7080 \
  -p 7442:7442 \
  -p 7443:7443 \
  -p 7446:7446 \
  -p 7447:7447 \
  -v /volume1/applications/unifi-video:/var/lib/unifi-video \
  --cap-add=DAC_READ_SEARCH \
  --cap-add=NET_BIND_SERVICE \
  --cap-add=SETGID \
  --cap-add=SETUID \
  --cap-add=SYS_ADMIN \
  --cap-add=SYS_PTRACE \
  --security-opt apparmor:unconfined \
  -d ctindel/unifi-video-controller:3.9.0
Ports used in the current setup:
- 6666/tcp: Inbound Camera Streams
- 7080/tcp: Web Interface over HTTPS
- 7442/tcp: Camera Management (as of v3.8.0+)
- 7443/tcp: Web Interface over HTTPS
- 7445/tcp: Video over HTTP (disable in my case)
- 7446/tcp: Video over HTTPS
- 7447/tcp: RTSP
UniFi Video NVR Settings
Configuring the camera password
Whenever a camera is adopted by the UniFi Video software, it automatically provisions its settings, updates its firmware and changes its default password. To ensure that no one can simply browse to the camera’s web interface and starts streaming its live feed, you should consider settings a good Camera Password (under UniFi Video Settings).

As soon as a camera is adopted by the UniFi Video software, it changes the default username/password to ubnt/<camera-password-from-unifi-video-settings>.
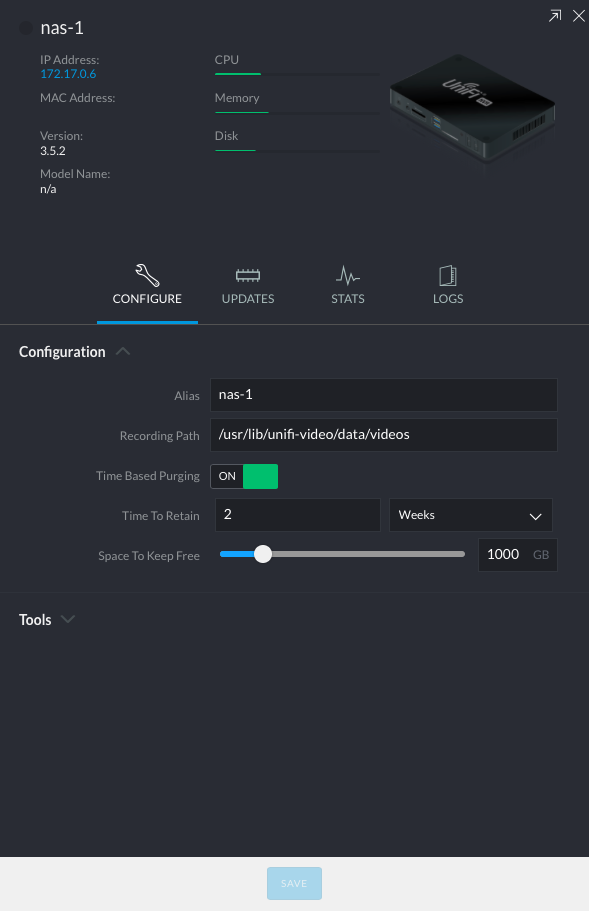
Enabling time based purging
To avoid getting out of space quickly, the UniFi Video software should be configured to automatically purge recordings.
- Open the UniFi Video Web interface and go to
Settings - Click on the (dubious)
NVR Settingsbutton - Enable
Time Based Purging - Set
Time To Retain(e.g.2 weeks) - Set
Space To Keep Free(e.g.1000GB) - Clock
Save

Camera Adoption
The default mode of Docker networking is bridge, which means each container creates a network stack on the default Docker bridge. This isolation is typically an obstacle when adopting UniFi cameras. The alternative is running the container with --net=host which uses the host’s network stack, at the cost of no network isolation.
If you’re running a home setup, then the workaround is simple and maintainable, allowing you to keep the default and more secure network isolation. First, attach the camera to your network and find its ip address on your router’s network table. Let’s imagine the ip of camera is 192.168.1.20 and that the Synology NAS has ip 192.168.1.8.
Browse to your camera’s web configuration (https://192.168.1.30/) and enter the default username/password combination of ubnt/ubnt.
Point the NVR address on the camera to the Synology NAS server to 192.168.1.8 and hit save.
Now go back to the UniFi Video web interface, click on Cameras and for each one, click Manage.
Enabling custom SSL certificate
If you already have a custom SSL certificate installed on your Synology NAS, you can configure UniFi Video to use it too.
On DSM 6+, by default the custom certificate is stored under /usr/syno/etc/certificate/system/default.
/usr/syno/etc/certificate/system/default/cert.pem: the certificate’s public key/usr/syno/etc/certificate/system/default/chain.pem: generated by DSM and includes the intermediate CA + root CA/usr/syno/etc/certificate/system/default/fullchain.pem: generated by DSM and includes the certificate + the intermediate CA + root CA/usr/syno/etc/certificate/system/default/privkey.pem: the certificate’s private key
Originally, UniFi Video did not have support for custom certificates, so they had to be manually imported using a script that would write to the Java Keystore file. Since version 3.8.1, experimental support for adding custom certificates has been enabled by default. It also started using those certificates to encrypt traffic between the browser and the cameras.
If you have already imported custom certificates in the past, enter the running container before upgrading:
docker exec -it unifi-video bash
And delete the following files:
data/keystore
data/ufv-truststore
conf/evostream/server.*
If you are currently running a version higher than 3.8.0, you will need to do everything listed below plus un-managing all cameras.
Stop the running container and change the working dir to the UniFi video volume data dir. In my case, it’s /volume1/applications/unifi-video.
Convert the private key to an RSA PKCS8 DER-encoded private key file:
openssl pkcs8 -topk8 -inform PEM -outform DER -nocrypt -in /usr/syno/etc/certificate/system/default/privkey.pem -out certificates/ufv-server.key.der
Convert the certificate to an X509 DER-encoded certificate file:
openssl x509 -in /usr/syno/etc/certificate/system/default/fullchain.pem -outform der -out certificates/ufv-server.cert.der
Make sure that the files are readable by the unifi-video user and group:
chown -R 107:109 certificates/
Under system.properties add the following line:
ufv.custom.certs.enable=true
Now start the container and the import process should be done automatically by UniFi Video. The files will be automatically removed once imported to the final keystore.
Updating to a newer build
Login via ssh and update the Docker image:
docker pull ctindel/unifi-video-controller
Remove the old container:
docker rm -f unifi-video
Re-run the same command that created the container in the first place.